In's and Out's of Lead-ins
|
|
My family's house where I grew up (well, got older) was probably typical of most when it came to mounting television antennas on the roof and running the twin−lead, 300-ohm transmission cable down to a point where it entered the house, and then from there to the TV set. In retrospect, it was a miracle the system worked any better than just hooking up the rabbit ears on top of the set. If nothing else, it demonstrated how much better a roof-mounted antenna was than just rabbit ears (unless you lived very close to the broadcast tower). If I remember correctly, the first picture in the article showing how "not" to run your cable into the house is the way we did it. I didn't even know there was a socket and plug available for the twin−lead, nor did it occur to me or my father that drilling a hole through the side of the house was an option (our house had too many unplanned holes as it was). This 1967 Radio−Electronics magazine article covers the basics of the proper method for routing the twin-lead cable. While it does mention the use of impedance matched power splitters, no instruction is offered on why or how to do it. Neither is there mention of the need to properly terminate unused jacks in order to keep everything working at an optimal level. In's and Out's of Lead-ins
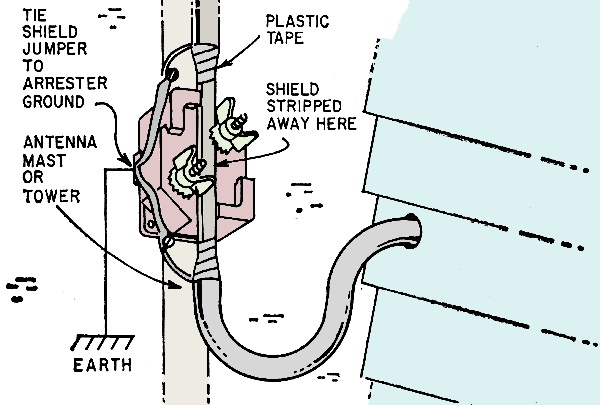
Fig. 1 - Before routing cable or twin-lead inside a building, be sure to use some form of lightning arrester. Ground it well. They're only pieces of wire, but they carry that all-important signal By Edward A. Lacy An antenna farm on the outside of your vine-covered cottage may result in a jungle of lead-in wires inside its walls. For whether you have TV, ham, SWL, Citizens-band or PM antennas (some poor souls have all of these!) the antenna lead-in presents a problem: How do you get the thing into the house neatly, efficiently and safely? Some would say, "Just drill a hole in the wall and pull it through." Many installations plainly follow this direct approach. Unfortunately, this simple method usually looks atrocious (especially if you are living in rented quarters). It's inconvenient to disconnect or service, and it may be unsafe according to the National Electrical Code. There are simple, straightforward procedures to fit most lead-in problems, however, plus new hardware to make the job easier. By following a few simple fundamentals, you can please your wife, get the best possible signal in and out of the house, and not electrocute your children and pets in the process. Let's follow your lead-in from the antenna to your equipment. We'll assume that you have made good mechanical and electrical connections at the antenna, there is no mechanical strain on the connections, and all connections have been made as weather-proof as possible. Weatherproof coax connectors by covering with silicone grease and all other connections by wrapping well with plastic tape or covering with a weatherboot.
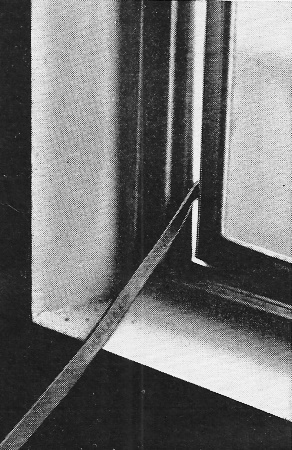
How not to route lead-in; the insulator wears through and the screen won't fit.
To move the TV and clean the rug, you simply unplug the lead-in at the wall box. If you have mast-mounted equipment - preamplifiers or matching transformers, for example - make sure you leave a drip loop (a U-shaped piece of the lead-in) to keep rain from running into your equipment. If you have an antenna rotator, leave enough slack in the lead-in to permit rotation. Extra slack also may be useful should you want to bring the antenna down to your level when disconnecting the lead-in. Don't forget to ground the mast and fit an efficient lightning arrester to the lead. We won't get into the controversy of coax vs twin-lead for TV here, except to say that coax is not nearly so critical to install, especially for color TV. If you do use coax for TV, get all-channel cable so you will be set up for uhf, regardless of whether you now have high-channel stations on the air in your area. No matter what type of lead-in you use, do not run it above or below power lines. Mount and restrict the lead-in so it can swing no closer than 10 feet to wires carrying more than 250 volts; no closer than 2 feet to wires carrying less than 250 volts. If no more than 150 volts are involved, you can run the lead-in within 4 inches of the power line, provided all lines are mounted securely to preserve the minimum permanent separation. With coax or shielded twin-lead, you can tape it to the mast about every 6 feet with plastic tape. This will keep it from blowing in the breeze and eventually breaking because of vibration. With oval or all-weather twin-lead (no more flat twin-lead, please!), use plastic clips or all-polyethylene-head standoff insulators every 6 feet down the mast and across the roof of your quarters. Note that suitable types of twin-lead are too rigid to be twisted as was required for flat line. For transmitting antennas, if coax is not used, mount the lead-in at least 3 inches away from the outer wall of the building, using nonabsorptive insulated supports. When bringing the lead-in into the house, you can run it directly through or alongside metal pipes if you use coax or shielded twin-lead. Unshielded twin-lead, of course, must avoid such pipes if possible. The only precautions necessary with coax: Don't crush it; don't pierce the insulation with staples, etc. Use hand-driven staples instead of a staple gun to avoid indenting the shield. Shielded twin-lead requires similar care. Now, where should you bring the lead-in into the house? New hardware allows you to bring it in practically any place-the roof, eaves, window or window board, basement or foundation wall, even directly through the outer wall to the point where the lead-in will be used. Which method is best? If one or more of your antenna outlets is to be mounted directly on an outside wall of your house, then it will probably be easier to bring the antenna directly through the wall using either a coax or twin-lead wall-through connector. You can, however, come up through the basement or crawl space and drill up through the floor for outside-wall outlets. For all inside-wall outlets, come through the attic (by way of the eaves, ventilator or roof), through the basement (by way of a basement window or wall), or through the crawl space under the house (by way of a ventilator or the foundation wall) and then up (or down) the wall as needed. Don't plan on snaking a lead-in down an outside wall; insulation and braces make it too difficult a task. Of these methods, the basement route is certainly the most convenient (unless you have a finished ceiling in the basement). You won't have to snake the lead-in down from the ceiling. For homes without a basement, the crawl space has the same advantage, too, if you care to brush aside the spiders and other denizens of the dusty, dark hole. If none of these methods works, you can, as a last resort, bring the lead-in through a window pane or window board near your gear. This technique, however, is unsightly and it hampers or prevents normal opening and closing of that window. For transmitting antennas: If your lead-in consists of bare wire, you should bring it into the house at a point where a human cannot touch it. Rf burns are dangerous and painful. Once you have determined the point of entry for your lead-in, bring it close to that point and form a drip loop. If you're using TV twin-lead, do not leave a full coil at this point (or any other point); it's murder for color! Strap the lead-in securely to the outside of the house so there will be no mechanical strain on the feedthrough connector.
Fig. 2 - You'll find that a wall feedthrough insulator is needed with twin-lead to protect and secure the body of the lead-in.
Fig. 3 - Often you can make a neat job by routing cable between basement rafters (in other words, just below ground-floor level). Outlet boxes for the cable go in walls.
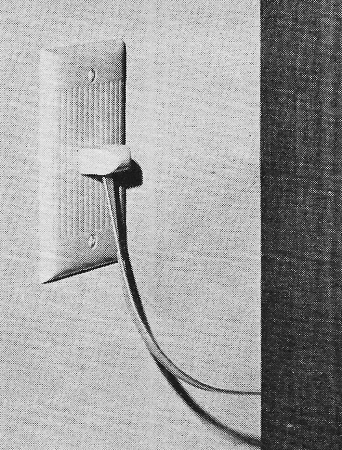
Fig. 5 - How to install cable and twin-lead receptacles. Cut hole in wall, then use plaster straps (a) at top and bottom of hole (b). Receptacle panels attach to straps and are available in either twinlead (c) or coax (d) types. Some have antenna-rotator jacks. Mount the lightning arrester close by, attach the antenna to it, and connect the appropriate ground wire. Arresters are not required for coax, if the outer shield is permanently and effectively grounded with an efficient grounding clamp. Note, however, that coax lightning arresters are made for Citizens-band and ham antennas. To protect shielded twin-lead from lightning, connect as shown in Fig. 1. At this point, it's necessary to decide where to place the multi-set coupler if you have or anticipate having more than one TV. If one of your outlets is mounted on an outside wall, mount the coupler in a weatherproof box on the outside of the house. If the outlets are to be mounted on inside walls, or if you come up to an outside-wall outlet through the basement or crawl space, then you can place the coupler conveniently inside the house. When installing coax, it is not necessary to use a bushing or feed through insulator to go through the wall, window or ventilation opening. If you wish, you can use a standard coax wall-through insulator (Fig. 2) which has a coax receptacle on the inside end. Twin-lead should be brought in through a feed through bushing or insulator (GC Electronics 1551 or Mosley 625 or equivalent, available with receptacle socket). Caution Do not drill into a wall or roof if you suspect there is an electric power line somewhere underneath. Several electricians, who should have known better, have been electrocuted this way. Use protective goggles and work gloves when drilling or chipping masonry. If you're not using coax for your transmitter, bring the lead-in through a drilled window pane or a rigid non-absorptive noncombustible insulating tube. Once you have picked the feed-through insulator, you can determine the size of hole you will need to drill. To drill through masonry foundations, use extra-length carbide-tip drills. For wood foundations, use standard 18-inch electrician's drills. Both types are large enough to drill holes for coax, but the masonry bit is not large enough for bushings or feed through insulators. To make masonry holes for bushings, start the hole with a carbide-tip bit, using a slow-speed drill if possible, and finish it with a regular star drill bit - a steel rod with a star-shaped point. Hold the star bit in one hand and strike a sharp blow with a hammer or mallet. Rotate the bit slightly after each blow. Since this is a hard, time-consuming job, try to go through a mortar joint, brick or cinder block instead of concrete, which is extremely difficult to drill through. If possible, drill the hole so it slants down slightly toward the outside so rain won't run through the bushing into the house.
Fig. 4 - Another way of running lead-in to a wall box is down through the attic. Instead of a star drill, you may use a large electric drill. Make certain the drill is grounded with a three-conductor wire and plug, since you'll probably be outdoors when using it. After inserting the feedthrough (Fig. 2) or coax, make the hole water- and weather-proof by puttying it with a material such as General Electric's bathroom seal or ordinary caulking compound. To insert the lead-in through a feedthrough or a hole, do not strip the end of the lead-in until you have pushed it through. Inside the house, mount any traps, filters, mixers, splitters, couplers, etc. you may have for TV or FM in a place convenient for adjustment and servicing, but not exposed to an undue amount of dust and moisture. In running the lead-in to the outlets, remember: Do not run lead-in nearer than 2 inches to power conductors, unless the power conductors are in cable armor or unless they are permanently separated by a continuous and firmly fixed nonconductor such as flexible tubing or porcelain tubes. Staple coax and shielded twin-lead on the inside of the house, using the same precautions as you did on the outside of the house. Standoff insulators are not necessary indoors; twin-lead can be held in place with plastic clips. Try to avoid long runs of unshielded twin-lead, and keep it away from plumbing pipes and metal-backed lath. When using shielded twin-lead, maintain shield continuity by splicing a jumper across the cable shields when you encounter boosters, couplers, outlets, etc. It's easier to make these connections when you install the cable than to go back later to do it. If you are running the lead-in underneath the floor, run it directly beneath the new outlet opening (Fig. 3) and drill a hole up through the subfloor and through the 2 by 4 plate on top of it. CAUTION: Be careful not to drill into a power line. If you are running lead-in through the attic, carrying it directly to the point over the wall in which the outlet is to be mounted, then drill down through the ceiling plate (Fig. 4). If your outlet is next to a closet, it may be simpler to come down through the closet ceiling in a corner of the closet where the lead-in will not be obtrusive. Now, come back up to the main floor and cut a hole in the wall large enough to mount plaster straps or mounting brackets. Mount the brackets. Attach the lead-in to the outlet plate, then attach the plate to the brackets. As indicated in Fig. 5, there are several manufacturers who are now making 300-ohm and coax outlets as well as coax or twin-lead in combination with rotor outlets. Avoid those outlets that combine ac power outlets with antenna outlets. Most, if not all of these, do not conform to the National Electrical Code. What should you do when you need outlets on two floors? You can bring a lead-in all the way from the attic through an inside wall down to the bottom floor, but it's a tricky business: You must remove the baseboard on the second floor and drill from the second floor toward the wall of the floor beneath. It's easier to run the second lead-in down the outside (or up the outside, depending on where your coupler is located) of the house. Note that there are two types of antenna outlets: surface mounted and flush mounted. The flush-mounted type allows you to hide your wiring; of course, the surface-mounted type is easier to install. If you are using coax for TV reception, you can use either a coax outlet or an outlet which has a 75- to 300-ohm matching transformer built in. If you are in a very strong signal area, unwanted TV signals can be received by the short length of lead-in that runs from the TV to the wall outlet. In such cases, use the coax outlet and mount the matching transformer on the back of the set.
Posted February 29, 2024 |
|