Improving the Receiver Using a Screen-Grid Coupling Stage |
|
In December of 1931, the discovery of deuterium (aka "heavy water") was announced by Harold Urey, Japan abandoned the gold standard, the New York Metropolitan Opera broadcasted an entire opera over radio for the first time (on Christmas day), and the ARRL's QST magazine published an article about how to improve a receiver by using a screen-grid coupling stage on vacuum tubes. A "tickler coil" is introduced via a tuned circuit to provide a small amount of positive feedback to the grid in order to make the amplifier stage more sensitive in the band of interest. Care needed to be taken to avoid so much feedback that oscillations could occur. As with most of these old articles I post, while the exact application might not be relevant in today's world of electronics, the basic principles are certainly timeless. Improving the Receiver Using a Screen-Grid Coupling Stage By Howard R. Cassler
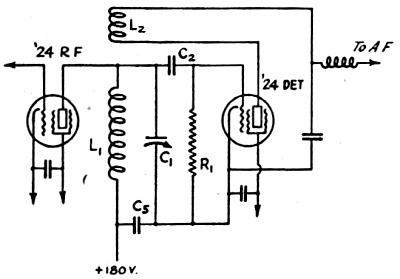
Fig. 1 - The usual method of tuned impedance coupling.
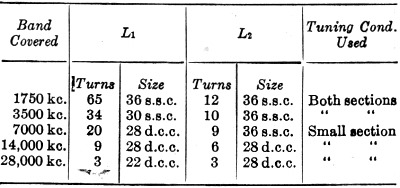
Coil Table
Fig. 2 - This circuit uses inductive coupling with a combined primary-tickler coil in the detector screen circuit. There are certain disadvantages in the use of an "untuned" r.f. stage in the high-frequency receiver, as compared to a tuned r.f. stage, chief among these being loss in selectivity (already none too great with one lonesome tuned circuit), "cross talk" from local B.C. transmitters, high noise level, etc. Referring to Fig. 1 the usual method of tuned impedance coupling, we see also that the r.f. tube's plate voltage is across the tuning capacity, that there is possibility of d.c. leakage through the detector grid condenser, a loading up of the minimum tuning capacity, etc. All these have previously been pointed out. The logical method of improvement between the r.f. stage and detector of course is the use of the inductive coupling; but this ordinarily requires coils with three separate windings and coil forms with six prongs, whereas most of us now have four or five-prong forms. Now the receiver circuit described here was developed with the following in mind: First, to improve the selectivity and signal to noise ratio; second, to provide" hard and fast" single-control tuning retaining calibration; third, to use four-prong tube-base coils. The unusual feature of this receiver is the method of regeneration, using inductive coupling from a combined primary tickler coil, but with the tickler coil removed from the plate circuit and put into the detector screen-grid circuit and shunt fed (L2 in Fig.2). This leaves the tuned secondary or grid circuit free from any direct connection to the r.f. tube. (This is not exactly an original idea and due credit probably belongs to the designers of the new Universal Super Wasp which uses a somewhat similar arrangement.) For all coils L1 is "close wound" with last few turns at top spaced to cover band. For L2 spacing between turns is approximately the diameter of the wire. The spacing between L1 and L2 is about 3/8 inch, except for 28,000 kc. where adjustment may be found necessary. The older type (longer) Bakelite tube bases will be required for the first three coils. All coils are made "hard and fast" with several coats of quick drying lacquer. Now to obtain a reasonable transfer of energy the impedance of this primary tickler (L2) should be somewhat greater than that provided by the usual size tickler coil. This is accomplished by using a greater than usual number of turns spaced somewhat further from L1 and of rather fine wire, space wound. (See coil table.) It is important that as L2 is increased the spacing from L1 should be increased to keep the point of oscillation at the optimum value of about 22 volts on the detector screen grid. Right here we might wish that tube bases were just a wee bit longer and that the Type '24 tube did not oscillate quite so easily - which it certainly does in this circuit, no trouble at all being had in getting up to and above 30,000 kc. Further following this impedance matching idea, a Type '35 tube was used in the r.f. stage. The plate impedance of the '35 is about half that of the '24, and a noticeable gain did result. A '35 tube in the detector stage seemed to make no difference. A word might be said about the by-pass C3. Its value should not be greater than the 40μμfd. shown. Even smaller values gave slightly better results, except, strangely enough, at 28 mc. In general its size should be kept down to where smooth regeneration results over all the bands to be covered. It goes without saying that both C3 and C6 should be high grade mica condensers; for instance, a certain .01-μfd. paper condenser at C7 resulted in a bad dead spot somewhere about 6800 kc. A beautifully smooth regeneration control resulted with a 100-μμfd midget variable "throttle" at C3. It did affect the tuning, however, and was not used. Other experiments were tried with tuning the grid circuit of the r.f. stage, but even though interlocking was at an absolute minimum, the extra gain did not seem to justify an added control. In this case the antenna was switched to the post "A," and L3-L4 wound identical to L1-L2.
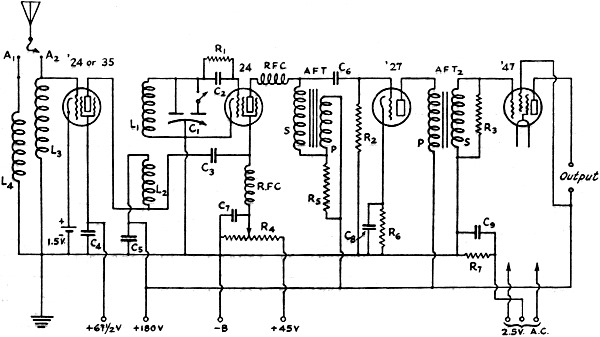
Fig. 3 - Complete circuit of the receiver. Parts List C1 - Remodeled 150-μμfd. S. L. F. variable split stator. Large section has two plates, small section one plate. Rotor has thee plates. All plates double spaced. C2 - 100-μμfd.grid condenser. C3 - 40-μμfd. blocking condenser. C4 C5 C6 - .006 μfd. C7 C8 C9 - 1.0 μfd. R1 - 3 megohms. R2 - 1 megohm. R3-.25 megohm. R4 - 50,000-ohm potentiometer; regeneration control. R5 - 10,000 ohms. R6 - 2000 ohms. R7 - 1000 ohms. RFC - Choke. AFT1 - Coupling impedance - audio transformer with windings connected in series. AFT2 - Audio-frequency transformer. L3, L4 - Next larger coil above L1-L2. In
The final receiver circuit is shown in Fig. 3. Photos are not available but the mechanical details are much the same as most ham receivers. The receiver is completely and heavily shielded using all-aluminum shields, panel and sub-panel, with sub-panel tube sockets. As much of the r.f. wiring as possible is kept above the sub-panel and all other wiring beneath in the usual manner. The two r.f. chokes are mounted below the sub-panel as close as possible to their respective socket terminals. The resistor R5 across the primary of the series-connected audio transformer was used to suppress fringe howl before the set was changed over. Although now not essential for this purpose it was left in because it improved the quality of phone signals. R6 and R7 furnish grid bias for the '27 and '47 tubes respectively. C8 and C9 have little effect on the output; no a.c. hum is noticeable with either phones or loud speaker. Incidentally, headphones are not used with a '47 tube in the output stage! As for results, this circuit gave even better than anticipated. The improvement in selectivity was very gratifying. (Try it out in the 3500-kc. 'phone band.) Signal to noise likewise improved and the biggest surprise of all was the drop in tube noises, the detector hiss being down fully 50%. We haven't figured it out in db. This drop in tube noises leads us to consider this circuit as the familiar separate detector and regenerator with their common grid circuit. The plate corresponds to the usual detector plate and the detector screen grid takes the place of the oscillator or regenerator tube plate. Incidentally, the detector plate voltage in this circuit can be dropped to as low as 22 1/2 volts with practically no effect on the regeneration. For full signal strength, however, the recommended 180 volts are used.
Posted May 26, 2021 |
|