|
October 1959 Electronics World
 Table of Contents
Wax nostalgic about and learn from the history of early electronics. See articles
from
Electronics World, published May 1959
- December 1971. All copyrights hereby acknowledged.
|
 With as inexpensive and readily available as
prefabricated test lead holders are nowadays, there is not a lot of motivation to make
your own. Such was not necessarily the case in 1959 when this DIY article appeared in
Electronics World magazine. Still, if you have some spare sheet metal laying
around and a bandsaw to cut it, you can save a couple bucks (or euros, yen, rubles, etc.)
by making one or more yourself. All of my test leads are draped over nails driven into
my wooden test bench, which can create a nasty snarl. Maybe I'll whip up one of these
for myself. BTW, one of the Pomona Test Lead Holders shown in the thumbnail that
is priced at $11.99 today would have cost a whopping
$1.40 in 1959 money. With as inexpensive and readily available as
prefabricated test lead holders are nowadays, there is not a lot of motivation to make
your own. Such was not necessarily the case in 1959 when this DIY article appeared in
Electronics World magazine. Still, if you have some spare sheet metal laying
around and a bandsaw to cut it, you can save a couple bucks (or euros, yen, rubles, etc.)
by making one or more yourself. All of my test leads are draped over nails driven into
my wooden test bench, which can create a nasty snarl. Maybe I'll whip up one of these
for myself. BTW, one of the Pomona Test Lead Holders shown in the thumbnail that
is priced at $11.99 today would have cost a whopping
$1.40 in 1959 money.
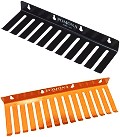
Test Cable Holder
By Charles E. Diehl
 Minimum space and the neat storage of patch cords
is a major problem in the ham shack or shop. We call the holder shown in the photograph
the "bear's claw" and it does a neat job of storing as many as 27 cords in a mere 7 1/2
inches. Cords can be removed easily as the spacing is such that fingers can grasp a cord
without disturbing those on either side. The cords are arranged in order of increasing
length from left to right with one length per slot. Each slot normally holds three banana
plug cords but four can be accommodated in a pinch. Minimum space and the neat storage of patch cords
is a major problem in the ham shack or shop. We call the holder shown in the photograph
the "bear's claw" and it does a neat job of storing as many as 27 cords in a mere 7 1/2
inches. Cords can be removed easily as the spacing is such that fingers can grasp a cord
without disturbing those on either side. The cords are arranged in order of increasing
length from left to right with one length per slot. Each slot normally holds three banana
plug cords but four can be accommodated in a pinch.
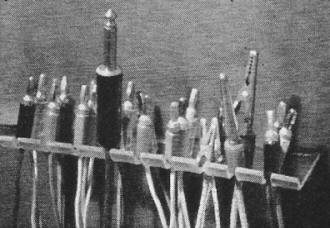
The holder was constructed of 1/8" Lucite. Slots are 1/8" wide and 1" deep. Spacing
is 3/4" center-to-center. The slots are made by sawing two cuts with a hacksaw and breaking
out the center. The cuts are then smoothed with a file. Total size of the plastic sheet
is 7 1/2" x 4" for top of the cabinet mounting and 3" wide with a 1" flange turned up
for wall or pegboard mounting. Claws are turned up by putting the front or claw edge
of the plastic on a flat hot plate and bending the front down 3/8" with a wood block
while the plate is warming up.
When the plastic softens, turn the back edge up at about a 45-degree angle. Move the
plastic to a smooth cold surface and hold the bend with the block until it cools and
re-sets. If this is not done the bend will straighten out as the sheet cools. The back
may be treated the same way. Dimensions, slot depth, and width or length may be varied
as desired. Thicker plastic can be used but is not as easy to work.
A piece of black paper was slotted and placed in back of the holder for photographic
purposes, the actual rack in our shop is clear.
Posted July 10, 2018
|