Resuscitation for Electric Shock
|
|
Electric shock, depending on severity, can range in damage from mere discomfort to body organ damage to instant death. If you have experienced an electric shock, you know that avoiding another incident is top priority when working around high voltages. My worst electric shock was either the time when I got hit with a 3-phase 440 VAC supply on an industrial air compressor motor, or the B+ vacuum tube plate supply on the air traffic control radar systems I worked on in the USAF. Both were, thankfully, from finger to finger or finger to forearm (no vital organs in the current path). I've been zapped a few other times, but nothing severe enough to require being resuscitated. Neither have I ever witnessed anyone else being shocked to the point of needing resuscitation. There are probably some gruesome electrocution videos on YouTube, but I don't intentionally view images of real people being hurt or killed (except for a few terrorist wipe-out missions taped from C-130's during the Gulf War). The guy in the video to the left is a riot as he subjects himself to various kinds of shocks to determine the effect. Some of it looks choreographed, but he really is hurting himself so that you don't have to wonder what to expect if it happens to you. Most countries have some form of Good Samaritan law in place that shields well-meaning bystanders from legal liability when her/she takes action to help an injured and helpless victim. More often than not, more good must be done than harm, or the laws would probably not still exist. Someone with good intentions can possibly worsen the situation due to improper application of life saving procedures and/or improperly moving the unfortunate soul. We have all heard of some doofus executing a precordial thump (not recommended anymore) and breaking the victim's ribs, of bruising kidneys when doing the Heimlich maneuver (aka abdominal thrust) on a choking person. I have undergone CPR and other emergency rescue training courses over the years (none recently), but cannot say how competently I would perform when faced with a real situation.
Resuscitation for Electric Shock - A Proven Tool for Saying Lives
Editor's Note: We have run several articles recently on the subject of electrical shock. Very little was said, however, about what to do for the shocked victim. The following material, excerpted. from the "Resuscitation Manual," prepared by the Edison Electric Institute, presents some of this information. In cases where breathing has been suspended by accidental causes, the advantages of manual artificial respiration are unchallenged. Records over the years show that thousands of lives have been saved by those who knew how to apply it to persons who have stopped breathing because of electric shock. Every year many additional lives are saved by properly trained rescuers. Many thousands of individuals, and society as a whole, owe a debt of eternal gratitude to the hundreds of public-spirited organizations and private companies who have sponsored and promoted artificial respiration training and practice - a proven tool for saving lives. Conversely, many lives have been lost needlessly because those available did not know how to apply artificial respiration in an emergency. Effects of Electric Shock The effect of electric shock on a human being is rather unpredictable and may manifest itself in a number of ways: a. Asphyxia: Electric shock may cause a cessation of respiration (asphyxia). Current passing through the body may temporarily paralyze (or destroy) either the nerves or the area of the brain which controls respiration. b. Burns - Contact and Flash: Contact burns are a common result of electric current passing through the body. The burns are generally found at the points where the current entered and left the body, and vary in severity, the same as thermal burns. The seriousness of these burns may not be immediately evident because their appearance may not indicate the depth to which they have penetrated.
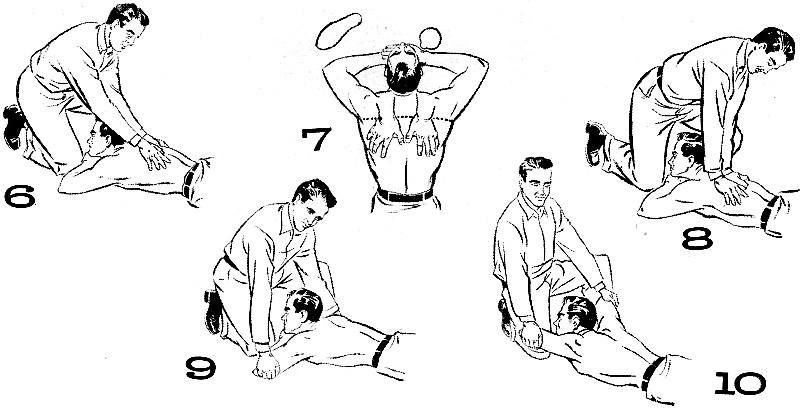
c. Fibrillation: Electric shock may disturb the natural rhythm of the heart beat. When this happens, the muscles of the heart are thrown into a twitching or trembling state and the action of the individual muscle fibers are no longer coordinated. The pulse disappears and circulation ceases. This condition is known as "ventricular fibrillation". and is serious. d. Muscle Spasm: A series of erratic movements of a limb or limbs may occur due to alternating contractions and relaxations of the muscles. This muscle-spasm action on the muscles of respiration may be a factor in the stoppage of breathing. Rescue Because a person may receive electrical shock in many different locations - on the ground, in buildings, on poles, or on steel structures - it is neither possible nor desirable to lay down definite methods of rescue. However, there are certain facts which should be remembered. 1. Freeing Victim: Because of the muscle spasm at the time of shock, most victims are thrown clear of contact. However, in some instances (usually low voltage) the victim is still touching live equipment. In either situation, the rescuer must be extremely careful not to get himself in contact with the live equipment nor to touch the victim while he is still in contact. He should "free" the victim as soon as possible so that artificial respiration can be applied without hazard. This may involve opening switches or cutting wires so that equipment within reach is de-energized, or using rubber gloves or other approved insulation to move the victim out of danger. 2. Applying Artificial Respiration: To be successful, artificial respiration must be applied within the shortest possible time to a victim who is not breathing. The graph (Fig. 1) shows the possibility of successful revival for each minute of delay. Normally, the type of resuscitation in which the victim is placed on the ground or floor is the best because the victim can be given additional treatment (stoppage of bleeding, wrapping in blanket to keep warm, etc.) and the "rescuer" can be easily relieved without an interruption of the breathing rhythm or cycle. In choosing the type of resuscitation to be used, ·the rescuer must consider the obvious injuries suffered by the victim. Broken ribs, for example, might make inadvisable the use of certain types of resuscitation; burns on the arms or on the face might exclude other types. However, no time should be lost in searching for injuries; artificial respiration should be started at once. There must be no delay to loosen clothing, warm the victim, or move him to a more comfortable position. However, an immediate check of the victim's mouth should be made by a quick pass of the fingers through the mouth to pull the tongue forward and remove false teeth, tobacco, chewing gum, etc. After resuscitation is started, the victim's belt, collar, and other clothing may be loosened, providing this doesn't interfere with the resuscitation process. Artificial respiration should be applied with a smooth and steady rhythm, as a person normally breathes this way. However, split-second timing is not necessary. After Resuscitation Is Started a. As soon as artificial respiration has been started and while it is being continued, an assistant (if available) should loosen any tight clothing about the victim's neck, chest, or waist. Liquids are not to be given by mouth until the victim is fully conscious. b. Resuscitation should be carried on at the nearest possible location to where the victim was injured. He should not be moved from this location until he is breathing normally, and then only upon his own volition and while lying down. Should it be necessary, because of extreme weather conditions, to move the victim before he is breathing normally, resuscitation should be carried on while he is being moved. c. A brief return of normal breathing does not necessarily indicate that resuscitation should be discontinued. Not infrequently the victim, after temporary recovery, stops breathing again. He must be watched and if normal breathing stops, artificial respiration must be resumed at once. d. Artificial respiration must be continued (four hours or longer, if necessary) until natural breathing is restored or rigor mortis (as determined by a doctor) sets in. e. To avoid strain on the victim's heart when he revives, he should be kept lying down and not be allowed to sit up or stand. If he revives before the doctor arrives, he should be given a stimulant, such as inhalation of ammonia, or a hot drink such as coffee or tea. The victim should be kept warm. However, when heating devices are applied to an unconscious person, great care must be taken to prevent possible burns. The heating devices should be tested on one's own body before use and if too hot, should be wrapped in a towel or other suitable insulation or allowed to cool to the proper temperature. Although there are many methods that have been employed for resuscitation, only two are described here. These are the mouth-to-mouth and back pressure-arm lift methods. Both techniques are highly effective and usually convenient to apply. Mouth-to-Mouth Method a. The victim should be laid on his back with his head placed as far back as possible so that his neck is extended. If there is a slope, placing the victim's body with the head slightly downhill is advisable. b. The operator uses one hand to elevate the victim's jaw so that it juts out by inserting a thumb between the victim's teeth, grasping the lower jaw at midline and lifting it forcefully upward so that the lower teeth are higher than the upper teeth. He then closes the victim's nose with his other hand (Fig. 2). When it is difficult to insert the thumb into a victim's mouth, or when the thumb almost fills the mouth (such as on a child), the operator lifts the jaw forcefully upward with both hands, places his fingers on both sides of the jaw (near the ear lobes), and closes the victim's nose by pinching the nostrils between the thumbs (Fig. 3). c. After taking a deep breath, the operator places his mouth completely over the victim's mouth with airtight contact. The victim's mouth should not be held open too wide as it must be totally covered by the operator's lips. (On an infant, the operator's mouth should be placed over the child's mouth and nose.) d. The operator then breathes or blows into the victim's mouth, forcefully for adults and gently for children (Figs. 4 and 5). The victim's chest should be watched and as soon as it rises, the blowing should be stopped and the operator's mouth quickly removed from the mouth of the victim, allowing him to exhale passively. e. The jaw must be held in an elevated position on both the inspiration and expiration phases. f. If the chest does not rise, the position of the head (paragraph a) and jaw (paragraph b) should be improved and the blowing done more forcefully. If the victim's lungs are still not ventilated, his airway may be obstructed. He should be placed in a face-down, head-down position, his tongue pulled forward, and patted firmly on the back to dislodge any foreign object. g. The cycle of inflation and exhalation should be repeated 12 times per minute for adults and 20 times per minute for infants and small children. h. If the victim's stomach swells during resuscitation, air may be entering it. This may be corrected by the operator gently pressing on the victim's stomach during exhalation. Back Pressure-Arm Lift Method a. The victim should be laid on his stomach with his elbows bent and his hands placed (one upon the other) under his head. When the victim is found lying on his back, his arms should be raised above his head and his body rolled over on his stomach by the operator grasping the victim's clothing at the waist and thigh and pulling. His head may be turned very slightly to one side, with the side of his chin resting on the back of one hand. Do not turn the head too much as this may constrict the windpipe. Air flow through the windpipe is dependent upon an unobstructed passage, which can be promoted by bending the head backward and pulling the jaw forward. If there is a slope, the body should be placed so that the head is slightly downhill. The operator kneels at the victim's head on either knee, or on both knees. If on both knees, he places one knee on each side and just above the head of the victim. If on one knee, the knee should be close to the victim's forearm and the foot near the elbow of his other arm (Fig. 6). The hands should be placed flat on the victim's back so that the heels of the hands lie just below an imaginary line running between the armpits, with the tips of the thumbs just touching and the fingers spread downward and outward (Fig. 7). b. The operator rocks forward until his arms are almost vertical, allowing the weight of the upper part of his body to exert slow, steady, even pressure downward upon his hands, keeping elbows straight (Fig. 8). About 40 to 50 pounds pressure should be applied to the normal adult. This forces the air out of the lungs. c. Then the operator rocks back slowly; in releasing the pressure he should avoid a final thrust upon the victim's back. He places his hands under the victim's arms at the elbows (Fig. 9). d. Keeping the elbows straight, the operator continues rocking backward slowly, drawing the victim's arms toward him and lifting until he feels the resistance of the victim's shoulders (Fig. 10). This armlift expands the chest by pulling on the chest muscles, arching the back, and relieving the weight on the chest. He now lowers the victim's arms gently to the ground. This completes a full cycle and should be repeated approximately 12 times per minute at a steady uniform rate. The compression and expansion phases should occupy about equal time, the release periods being of minimum duration.
Posted June 14, 2018 |
|