Introduction to Test Equipment |
||||||||||||||||||||||||||||||||||||||||||||||||||
|
NEETS Module 15 − Principles of Synchros, Servos, and Gyros Pages i, 1−1, 1−11, 1−21, 1−31, 1−41, 1−51, 1−61, 1−71, 2−1, 2−11, 2−21, 2−31, 3−1, 3−11, 3−21, 4−1, Index
Chapter 2
SERVOS
Learning Objectives
Upon completion of this chapter you will be able to:
1. Define the term "servo system" and the terms associated with servo systems, including open-loop and closed-loop control systems.
2. Identify from schematics and block diagrams the various servo circuits; give short explanations of the components and their characteristics; and of each circuit and its characteristics.
3. Trace the flow of data through the components of typical servo systems from input(s) to outputs(s) (cause to effect).
SERVOS
Servo mechanisms, also called SERVO Systems or SERVOS for short, have countless applications in the operation of electrical and electronic equipment. In working with radar and antennas, directors, computing devices, ship's communications, aircraft control, and many other equipment, it is often necessary to operate a mechanical load that is remote from its source of control. To obtain smooth, continuous, and accurate operation, these loads are normally best controlled by synchros. As you already know, the big problem here is that synchros are not powerful enough to do any great amount of work. This is where servos come into use.
A servo system uses a weak control signal to move large loads to a desired position with great accuracy. The key words in this definition are move and great accuracy. Servos may be found in such varied applications as moving the rudder and elevators of a model airplane in radio-controlled flight, to controlling the diving planes and rudders of nuclear submarines.
Servos are powerful. They can move heavy loads and be remotely controlled with great precision by synchro devices.
They take many forms. Servo systems are either electromechanical, electrohydraulic, hydraulic, or pneumatic.
Whatever the form, a relatively weak signal that represents a desired movement of the load is generated, controlled, amplified, and fed to a servo motor that does the work of moving the heavy load.
Q-1. What is a servo?
CATEGORIES of CONTROL Systems
A control system is a group of components that are linked together to perform a specific purpose. Generally, a control system has a large power gain between input and output. The components used in the
2-1 system and the complexity of the system are directly related to the requirements of the system's application.
Control systems are broadly classified as either Closed-Loop or OPEN-Loop.
Closed-loop control systems are the type most commonly used in the Navy because they respond and move the loads they are controlling quicker and with greater accuracy than open-loop systems.
The reason for quicker response and greater accuracy is that an automatic feedback system informs the input that the desired movement has taken place. Upon receipt of this feedback information, the system stops the motor, and motion of the load ceases until another movement is ordered by the input. This is similar to the system that controls heat in many homes. The thermostat (input) calls for heat. The furnace (output) produces heat and distributes it. Some of the heat is "fed back" to the thermostat. When this "feedback" raises the temperature of the room to that of the thermostat setting, the thermostat responds by shutting the system down until heat is again required. In such a system, the feedback path, input to output and back to input, forms what is called a "closed loop." This is a term you will hear and use often in discussions of control systems. Because closed-loop control systems are automatic in nature, they are further classified by the function they serve (e.g., controlling the position, the velocity, or the acceleration of the load being driven).
An open-loop control system is controlled directly, and only, by an input signal, without the benefit of feedback. The basic units of this system are an amplifier and a motor. The amplifier receives a low- level input signal and amplifies it enough to drive the motor to perform the desired job. Open-loop control systems are not as commonly used as closed-loop control systems because they are less accurate.
OPEN-Loop CONTROL System
As we stated previously, an open-loop control system is controlled directly, and only, by an input signal. The basic units of this type consist only of an amplifier and a motor. The amplifier receives a low- level input signal and amplifies it enough to drive the motor to perform the desired job.
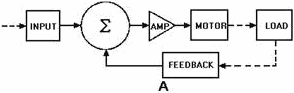
The open-loop control system is shown in basic block diagram form in figure 2-1. With this system, the input is a signal that is fed to the amplifier. The output of the amplifier is proportional to the amplitude of the input signal. The phase (ac system) and polarity (dc system) of the input signal determines the direction that the motor shaft will turn. After amplification, the input signal is fed to the motor, which moves the output shaft (load) in the direction that corresponds with the input signal. The motor will not stop driving the output shaft until the input signal is reduced to zero or removed. This system usually requires an operator who controls speed and direction of movement of the output by varying the input. The operator could be controlling the input by either a mechanical or an electrical linkage.
Figure 2-1. - Open-loop control system basic block diagram.
2-2 The Closed-Loop CONTROL System
A closed-loop control system is another name for a servo system. To be classified as a servo, a control system must be capable of the following:
1. Accepting an order that defines the desired result
2. Determining the present conditions by some method of feedback
3. Comparing the desired result with the present conditions and obtaining a difference or an error signal
4. Issuing a correcting order (the error signal) that will properly change the existing conditions to the desired result
5. Obeying the correcting order We have discussed the open- and closed-loop control systems and defined a servo system as a closed-loop control system. Although not technically accurate by definition, open-loop control systems are also often referred to in the Navy and many publications as servo systems even though they lack one of the five basic requirements, that of feedback.
Q-2. In an open-loop control system, what action reduces the input to zero so the load is stopped at the desired position?
Q-3. What basic requirement of a closed-loop system (not present in open-loops) enables present load position to be sensed?
Operation of a Basic SERVO System
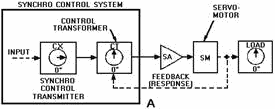
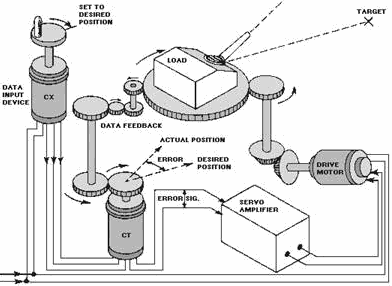
For the following discussion of a servo system, refer to figure 2-2, view (A), view (B), view (C) and view (D).This closed-loop servo system is the most common type in the Navy today. It is normally made up of electromechanical parts and consists basically of a synchro-control system, servo amplifier, servo motor, and some form of feedback (response).
Figure 2-2A. - a basic servo system (closed-loop).
2-3
Figure 2-2B. - a basic servo system (closed-loop).
Figure 2-2C. - a basic servo system (closed-loop).
Figure 2-2D. - a basic servo system (closed-loop).
The synchro-control system provides a means of controlling the movement of the load, which may be located in a remote space. The servo amplifier and servo motor are the parts of the system in which power is actually developed (to move the load).
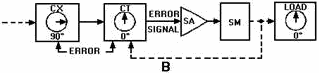
As you remember, the controlling signal from a CT is relatively weak, too weak to drive an electric motor directly. In views a through D of figure 2-2, assume that the control signal will be initiated by a hand crank input connected to the synchro transmitter (CX). The dials located on the CX and the CT indicate the positions of the synchro's rotors, while the dial on the load indicates the position of the load.
In view A, the dials of both the CX and the load indicate that the load is in the desired position. Because the load is where it should be, there will be no error signal present at the servo amplifier and no power to the servo motor.
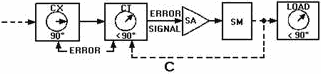
In view B, the rotor of the CX has been moved by the hand crank to 90º. (This indicates that it is ordered to move the load by 90º.) Notice that the rotor of the CT is still at 0º. The CT now develops a signal, called the ERROR Signal, which is proportional in amplitude to the amount the CT rotor is out of correspondence with the CX rotor. The phase of the error signal indicates the direction the CT rotor must move to reduce the error signal to zero or to "null out." The error signal is sent to the servo amplifier. In view C, the error signal has been amplified by the servo amplifier and sent on to the servo motor. The motor starts to drive in the direction that will reduce the error signal and bring the CT rotor back to the point of correspondence. In this case the motor is turning clockwise.
2-4 The mechanical linkage attached to the servo motor also moves the rotor of the CT. This feedback causes the amplitude of the error signal to decrease, slowing the speed at which the load is moving.
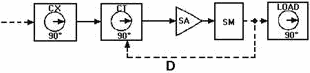
In view D, the servo motor has driven both the load and the rotor of the CT, so that the CT is now in correspondence with the CX rotor. As a result, the error signal is reduced to zero (nulled). The load stops at its new position. Note that in this servo system, we moved a heavy load to a predetermined position through the simple turning of a hand crank. In responding to the hand crank, the servo system performed a basic positioning function.
Two key points for you to remember, thus far, about the operation of the closed-loop servo system are:
1. The original error (movement of the CX rotor) was "detected" by the CT. For this reason the CT is called an ERROR DETECTOR.
2. The servo motor, in addition to moving the load, also provides mechanical feedback to the CT to reduce the error signal. For this reason the servo motor is also called an ERROR REDUCER.
Q-4. An error signal is the difference between what two quantities fed to the CT (error detector)? Q-5. What are the two functions of the servo motor in the system shown in figure 2-2?
FunctionAL SERVO LoopS
Servo systems are also classified according to their functions: POSITION, VELOCITY, and ACCELERATION. We will cover the most common, POSITION and VELOCITY, in detail.
The Position Servo Loop
The primary purpose of the POSITION SERVO is to control the position of the load it is driving. It can be used to position a great number of devices (for example, valves, control surfaces, weapons, etc.). The basic servo loop we just explained using the block diagram in figure 2-2 is that of an ac position servo system. In the ac position servo system, the amplitude and phase of the ac error signal determine the amount and direction the load will be driven.
In a dc position servo system, the amplitude and polarity of a dc error signal respectively are used to determine the amount and direction the load will be driven.
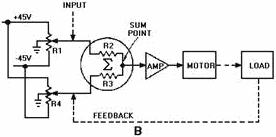
Figure 2-3, view A, is a block diagram of a closed-loop de position servo. Note the Greek letter Sigma (!), meaning summation, surrounded by a circle.
Figure 2-3A. - Block diagram of a position servo.
This is the summation, or "sum point" where the input signal, and the response signal (feedback) are summed to produce the error signal.
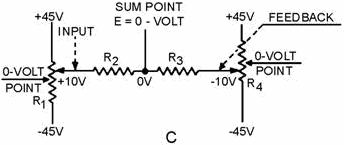
2-5 View B shows a more in-depth illustration of view A. With the wiper arms of R1 and R4 at the midpoint of travel, the voltage from the wiper arm to ground is zero volts. Therefore, zero volts would also be measured at the connection point between R2 and R3 (the summation point). This means that the error signal is zero. With no input signal, the amplifier output is zero; therefore, the motor shaft remains stationary.
Figure 2-3B. - Block diagram of a position servo.
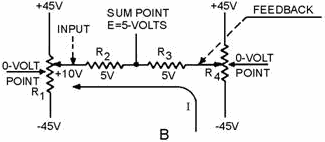
For the purpose of explanation, imagine that the R1 wiper arm is mechanically moved upward to a new position where a voltage between the wiper arm and ground measures +10 volts. Further measurement shows zero volts between the wiper arm of R4and ground. Since R 2 and R3 are of equal values, +5 volts is measured between the sum point and ground because 5 volts is dropped across each resistor. The +5 volts at the sum point is the "error" signal.
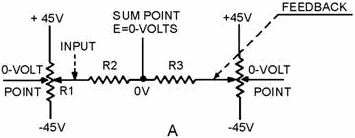
As shown in figure 2-4, (view A, view B, and view C),when no error is present, the voltage at the sum point is zero. This is because the network composed of R1, R2, R 3, and R4 is balanced. When the wiper of R 1 is moved toward +45 volts, the network becomes unbalanced as shown in view B. The left- hand side of R 2 becomes positive. This causes current to flow from +45 volts through R3 and R2 to the 10 volts at the left side of R2. Because R2 and R3 are of equal value, the voltage drops then will be equal; therefore, the voltage at the sum point will equal +5 volts.
Figure 2-4A. - Development of the error signal.
2-6
Figure 2-4B. - Development of the error signal.
Figure 2-4C. - Development of the error signal.
The +5 volt error signal is fed into the amplifier. The amplified output starts driving the motor. The mechanical feedback from the motor drives the R4 wiper arm down when the R1 wiper is moved up, as shown in view C. This causes the right-hand side of R3 to go negative. When the R 4 wiper travels far enough toward negative, it causes the right-hand side of R3 to equal the voltage, but of opposite polarity, of the left-hand side of R2. Simply stated, the voltage at the sum point will be zero again, and the motor will stop. This is true because R2 and R 3 are of equal ohmic value, and when the left-hand side equals +10 volts, the right-hand side equals -10 volts. The point between the two resistors becomes zero volts at this time. At the instant that this occurs, the output shaft will have positioned the load to the new position.
Figure 2-5 shows the basic operation of a typical position servo having wide application in Navy equipment. Remember that in a position servo, an input order indicates a position in which a load is to be placed. The load in figure 2-5 is a gun turret. The purpose of the system is to position the gun by means of an order from a remote hand crank. The load is mechanically coupled through a gear train to the rotor of a CT so that the turret's position is always accurately represented by the position of the CT's rotor. An order signaling the desired position of the gun turret is fed into the servo by positioning the rotor of the CX with the hand crank. a corresponding signal immediately appears across the CT stator. This signal differs from the actual position of the gun turret, causing an error voltage to be developed across the CT rotor. The error voltage is fed from the CT rotor to the servo amplifier. At this point it is converted into power with a polarity or phase relationship that drives the motor in the direction necessary to bring the load into the
2-7 desired position. As the turret moves, mechanical feedback turns the CT rotor toward agreement with the CX rotor. As the load approaches the proper position, less and less power is supplied to the motor because of the decreasing error voltage developed in the CT. When the electrical position of the CT rotor agrees with the position of the CX rotor, the error voltage reaches zero and power is removed from the motor. The turret is now in the desired position.
Figure 2-5. - Typical position servo.
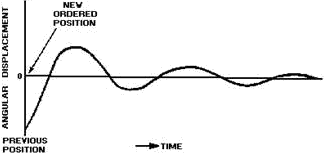
In the actual system, the heavy gun turret's momentum tends to carry it past the desired position. This overshoot causes the rotor of the CT to move out of correspondence with the CX rotor. This, in turn, develops a new error signal that is opposite in polarity to the original input signal. The new error signal causes the turret to drive back toward the desired position - but the turret's momentum once again causes an overshoot, making the system drive in the opposite direction again. If this oscillation of the load around the desired position is allowed to go unchecked, a condition known as HUNTING results. Figure 2-6 shows graphically the result of a series of over-travels of the correspondence point (hunting). In most servos an electronic network known as an ANTIHUNT or DAMPING system is used to minimize this undesirable effect. We will cover anti-hunt and damping systems in depth later in this chapter.
2-8
Figure 2-6. - Over-travels of the correspondence point (hunting).
Q-6. What are the three relatively common classifications of servo systems by function?
Q-7. The output of the sum point must contain information that controls what two factors of load movement in a position servo?
Q-8. What term is used for a series of overshoots in a servo system?
Velocity Servo Loop
The VELOCITY SERVO is based on the same principle of error-signal generation as the position servo, but there are some operational differences. Two major differences are as follows:
1. In this loop the VELOCITY of the output is sensed rather than the position of the load.
2. When the velocity loop is at correspondence or null position, an error signal is still present and the load is moving.
This type of servo is used in applications where the load is required to be driven at a constant speed. This speed is governed by the level of the error signal present. Radar antennas, star-tracking telescopes, machine cutting tools, and other devices requiring variable speed regulation are all examples of the types of load this servo may be used to drive.
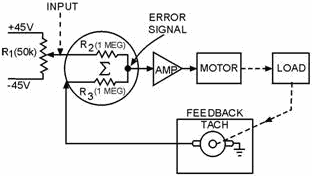
Figure 2-7 is a block diagram of a velocity servo. It is similar to the block diagram of the position servo loop except that the velocity servo loop contains a TACHOMETER in the feedback line. The tachometer (tach) is a small generator that generates a voltage proportional to its shaft speed.
2-9
Figure 2-7. - Block diagram of a velocity servo.
In this application, the tach is used as a feedback device and is designed to produce 1 volt of feedback for each 10 rpm.
Let's assume that the motor is designed to turn 10 rpm for each volt of error signal. Figure 2-7 shows the tach mechanically connected to the load. With this arrangement, the shaft of the tach rotates as the load rotates, and the tach can be said to "sense" the speed of rotation of the load. For purposes of explanation, we win assume that the load is an antenna that we want to rotate at 30 rpm.
Initially, the wiper arm of R1 is set at the 0-volt point (mid-position). This applies 0 volts to the left side of R 2. Since the motor is not turning, the load is not being driven, and the tach output is 0 volts. This applies 0 volts to the left side of R 3. Under these conditions, 0 volts is felt at the sum point and the motor is not driven. The voltage at the sum point is the error signal. When the wiper arm of R1 is moved to the -9 volt point, an error signal appears at the sum point. At the first instant, the error signal (at the sum point) is -4.5 volts. This is because, at the first instant, the load and tach have not started to move. With the tach output at 0 volts, and the wiper of R1 at -9 volts, -4.5 volts is present at the sum point. This voltage will cause the motor to start to rotate the load.
After a period of time, the load (and tach) are rotating at 10 rpm. This causes the tach to have an output of +1 volt. With +1 volt from the tach applied to the bottom of R3, and -9 volts (from R1 wiper) applied to the top of R2, the voltage at the sum point (error signal) is -4 volts. Since the motor will turn 10 rpm for each volt of error signal, the motor continues to speed up. When the load reaches 30 rpm, the tach output is +3 volts. With this +3 volts at the bottom of R3 and the -9 volts at the top of R 2, the error signal at the sum point is -3 volts. This -3 volts is the voltage required to drive the motor at 30 rpm, and places the system in balance. This satisfies the two conditions of the velocity servo. (1) The velocity of the output is sensed (by the tach), and (2) an error signal (-3 volts) is still present and the load continues to move when the velocity loop is at correspondence (30 rpm).
You may ask why the velocity loop and feedback are necessary. If this motor turns 10 rpm for each 1 volt error signal, why not simply feed -3 volts into this amplifier from the wiper of R1 and not have a tach or summing network?
The answer is that the velocity loop will regulate the speed of the load for changing conditions. If the load in figure 2-7 were a rotating antenna on a ship, the antenna would tend to slow down as the wind opposed its movement and speed up as the wind aided its movement. Whenever the antenna slowed down, the output of the tach would decrease (since the tach is connected to the load). If the tach output
2-10
|
||||||||||||||||||||||||||||||||||||||||||||||||||