Introduction to Electrical Conductors, Wiring Techniques, and Schematic Reading
|
||||||||||||||||||||||||||||||||||||||||||||||||||
|
NEETS Module 4 − Introduction to Electrical Conductors, Wiring Techniques, and Schematic Reading Pages i, 1−1, 1−11, 1−21, 2−1, 2−11, 2−21, 2−31, 2−41, 3−1, 3−11, 3−21, 4−1, 4−11, Index
Figure 2-43. - Starting double lace.
Figure 2-44. - Terminating double lace.
Figure 2-45. - Alternate method of terminating the lace.
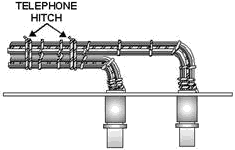
Figure 2-46. - Marling hitch as a lock stitch. The spare conductors of a multiconductor cable should be laced separately, and then tied to active conductors of the cable with a few telephone hitches. When two or more cables enter an enclosure, each cable group should be laced separately. When groups are parallel to each other, they should be bound together at intervals with telephone hitches (figure 2-47).
Figure 2-47. - Spot tying cable groups. Q51. What size wire bundles require double lace? Q52. How is the double lace started? Q53. How are laced cable groups bound together? SPOT TYING When cable supports are used in equipment as shown in figure 2-48, spot ties are used to secure the conductor groups if the supports are more than 12 inches apart. The spot ties are made by wrapping the cord around the group as shown in figure 2-49. To finish the tie, use a clove hitch followed by a square knot with an extra loop. The free ends of the cord are then trimmed to a minimum of 3/8 inch.
Figure 2-48. - use of spot ties.
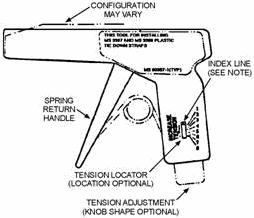
Figure 2-49. - Making spot ties. SELF-CLINCHING CABLE STRAPS Self-clinching cable straps are adjustable, lightweight, flat nylon straps. They have molded ribs or serrations on the inside surface to grip the wire. They may be used instead of individual cord ties for securing wire groups or bundles quickly. The straps are of two types: a plain cable strap and one that has a flat surface for identifying the cables. Caution Do not use nylon cable straps over wire bundles containing coaxial cable. Do not use straps in areas where failure of the strap would allow the strap to fall into movable parts. Installing self-clinching cable straps is done with a Military Standard hand tool, as shown in figure 2-50. An illustration of the working parts of the tool is shown in figure 2-51. To use the tool, follow the manufacturer's instructions.
Figure 2-50. - Installing self-clinching cable straps.
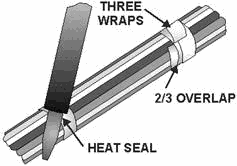
Figure 2-51. - Military Standard hand tool for self-clinching cable straps. Warning Use proper tools and make sure the strap is cut flush with the eye of the strap. This prevents painful cuts and scratches caused by protruding strap ends. Do not use plastic cable straps in high-temperature areas (above 250º F). High-TEMPERATURE PRESSURE-SENSITIVE TAPE LACING High-temperature, pressure-sensitive tape must be used to tie wire bundles in areas where the temperature may exceed 250º F. Install the tape as follows (figure 2-52): 1. Wrap the tape around the wire bundle three times, with a two-thirds overlap for each turn. 2. Heat-seal the loose tape end with the side of a soldering iron tip.
Figure 2-52. - Securing wire bundles in high-temperature areas. Warning Insulation tape (including the glass fiber type) is highly flammable and should not be used in a high-temperature environment. Only insulation tape approved for high-temperature operation (suitable for continuous operation at 500º F) should be used in high-temperature environments. Q54. When are spot ties used? Q55. What is used to install self-clinching cable straps? Q56. What is used to tie wire bundles in high-temperature areas? Summary In this chapter you have learned some of the basic skills required for proper wiring techniques. We have discussed conductor splices and terminal connections, basic soldering skills, and lacing and tying wire bundles. The basic requirement for any splice or terminal connection is that it be both mechanically and electrically as strong as the conductor or device with which it is to be used. Insulation Removal - The first step in splicing or terminating electrical conductors is to remove the insulation. The preferred method for stripping wire is by use of a wire-stripping tool. The hot-blade stripper cannot be used on such insulation material as glass braid or asbestos. An alternate method for stripping copper wire is with a knife. a knife is the required tool to strip aluminum wire. Take extreme care when stripping aluminum wire. Nicking the strands will cause them to break easily. Western Union Splice - a simple connection known as the Western Union splice is used to splice small, solid conductors together. After the splice is made, the ends of the wire are clamped down to prevent damage to the tape insulation.
Staggered Splice - The staggered splice is used on multiconductor cables to prevent the joint from being bulky. Rattail Joint - a splice that is used in a junction box and for connecting branch circuits; wiring is placed inside conduits.
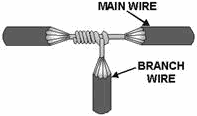
Fixture Joint - When conductors of different sizes are to be spliced, such as fixture wires to a branch circuit, the fixture joint is used. Knotted Tap Joint - This type of splice is used to splice a conductor to a continuous wire. It is not considered a "butted" splice as the ones previously discussed.
Splice Insulation - Rubber tape is an insulator for the type of splices we have discussed so far.
Friction Tape - It has very little insulating value but is used as a protective covering for the rubber tape. Another type of insulating tape is plastic electrical tape, which is quite expensive. Terminal Lugs - The terminals used in electrical wiring are either of the soldered or crimped type. The advantage of using a crimped type of connection is that it requires very little operator skill, whereas the soldered connection is almost completely dependent on the skill of the operator. Some form of insulation must be used with noninsulated splices and terminal lugs. The types used are clear plastic tubing (spaghetti) and heat-shrinkable tubing. When a heat gun is used to shrink the heat-shrinkable tubing, the maximum allowable heat to be used is 300º F. When using the compressed air/nitrogen heating tool, the air/nitrogen source cannot be greater than 200 psig.
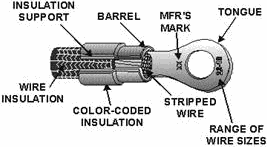
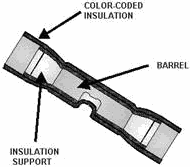
Aluminum Terminals and Splices - Aluminum terminals and splices are noninsulated and very difficult to use. Some of the things you should remember when working with aluminum wire are: (1) Never attempt to clean the aluminum wire. There is a petroleum abrasive compound in the terminal lug or splice that automatically cleans the wire. (2) The only tools that should be used for the crimping operation are the power crimping type. (3) Never use lock washers next to aluminum terminal lugs as they will gouge out the tinned area and increase deterioration. Preinsulated Copper Terminal Lugs and Splices - The most common method of terminating and splicing copper wires is with the use of preinsulated terminal lugs and splices. Besides not having to insulate the terminal or splice after the crimping operation, the other advantage of this type is that it gives extra wire insulation support. Several types of crimping tools can be used for these types of terminals and splices. The tool varies with the size of the terminal or splice. Preinsulated terminal lugs and splices are color coded to indicate the wire size they are to be used with.
Soldering - The basic skills required to solder terminal lugs, splices, and electrical connectors are covered in this area. Prior to any soldering operation, the items to be soldered must be cleaned; they will not adhere to dirty, greasy, or oxidized surfaces. The next step is the "tinning" process. This process is accomplished by coating the material to be soldered with a bright coat of solder. The wire to be soldered must be stripped to 1/32 inch longer than the depth of the solder cup of the terminal, splice, or connector to which it is to be soldered. This is to prevent burning the insulation. It also allows the wire to flex at the stress point. When you tin the wire, it should be done to one-half of the stripped length. When soldering a connection, take precaution to prevent movement of the parts while the solder is cooling. a "fractured solder" joint will result if this precaution is not taken.
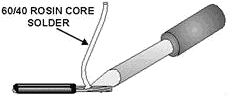
Soldering Tools - The important difference in soldering iron sizes is not the temperature (they all produce 500º F to 600º F), but the thermal inertia. Thermal inertia is the ability of soldering tools to maintain a satisfactory soldering temperature while giving up heat to the joint to be soldered. a well- designed soldering iron is self-regulating because its heating element increases with the rising temperature, thus inciting the current to a satisfactory level. When using a soldering gun, do not press the switch for periods longer than 30 seconds. Doing so will cause the tip to overheat to the point of incandescence. The nuts or screws that retain the tips on soldering irons and guns tend to loosen because of the continuous heating and cooling cycles. Therefore, they should be tightened periodically. You should never use a soldering gun on electronics components, such as resistors, capacitors, or transistors. An advantage of using a resistance soldering iron to solder a wire to a connector is that the soldering tips are only hot during the brief period of soldering the connection. Solder - Ordinary soft solder is a fusible alloy of tin and lead used to join two or more metals at temperatures below their melting point. The metal solvent action that occurs when copper conductors are soldered together takes place because a small amount of the copper combines with the solder to form a new alloy. Therefore, the joint is one common metal. The tin-lead alloy used for general-purpose soldering is composed of 60-percent tin and 40-percent lead (60/40 solder). Flux - Flux is used in the soldering process to clean the metal by removing the oxide layer on the metal and to prevent further oxidation during the soldering process. Always use noncorrosive, nonconducting rosin fluxes when soldering electrical and electronic components. Solvents - Solvents are used in the soldering process to remove contaminants from the surfaces to be soldered. Soldering Aids - use a heat shunt when you solder heat-sensitive components. It dissipates the heat, thereby preventing damage to the heat-sensitive component. Some type of soldering iron holder or guard should be used to prevent the operator from being burned.
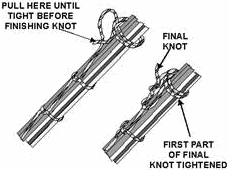
Lacing Conductors - The purpose of lacing conductors is to present a neat appearance and to facilitate tracing the conductors when alterations or repairs are required. Flat tape is preferred for lacing instead of round cord. Cord has a tendency to cut into the wire insulation. The amount of flat tape or round cord required to lace a group of conductors is about two and one-half times the length of the longest conductor. a lacing shuttle is useful during the lacing operation to prevent the tape or cord from fouling. Wires should only be twisted prior to lacing if it is required, such as for filament leads in electron tube amplifiers. When lacing wire bundles containing coaxial cables, use the proper flat tape and do not tie the bundles too tightly. Never use round cord on coaxial cable. a single lace is started with a square knot and at least two marling Hitches. a double lace is required for wire bundles that are 1 inch or more in diameter. It is started with a telephone hitch. Cable groups are bound together by use of telephone hitch
Spot Ties - Spot ties are used when cable supports are used that are more than 12 inches apart.
Self-clinching Cable Straps - If self-clinching cable straps are used, they should be installed with the Military Standard hand tool designed for their use. High-temperature Areas - When you are required to tie wire bundles in high-temperature operating areas, use only high-temperature, pressure-sensitive tape. Answers to Questions Q1 Through Q56. A1. The connection must be both mechanically and electrically as strong as the conductor or device with which it is used A2. By use of a wire-stripping tool A3. Hot-blade stripper. A4. Knife. A5. To prevent damage to the tape insulation. A6. To prevent the joint from being bulky. A7. When wires are in conduit and a junction box is used. A8. Fixture joint. A9. Knotted tap joint. A10. As a protective covering over the rubber tape. A11. Requires relatively little operator skill to install. A12. Spaghetti or heat-shrinkable tubing. A13. 300º F A14. 200 psig. A15. No, it is done automatically by the petroleum abrasive compound that comes in the terminal or splices. A16. Power-operated crimping tools. A17. It gouges the terminal lug and causes deterioration. A18. The use of preinsulated splices and terminal lugs. A19. It has insulation support for extra supporting strength of the wire insulation. A20. To identify wire sizes they are to be used on. A21. Solder will not adhere to dirty, greasy, or oxidized surfaces. A22. The coating of the material to be soldered with a light coat of solder. A23. To prevent burning the insulation during the soldering process and to allow the wire to flex easier at a stress point. A24. One-half the stripped length. A25. Movement of the parts being soldered while the solder is cooling. A26. The capacity of the soldering iron to generate and maintain a satisfactory soldering temperature while giving up heat to the joint being soldered. A27. Although its temperature is as high as the larger irons, it does not have thermal inertia. A28. The resistance of its heating element increases with rising temperature, thus limiting the current flow. A29. File the tip until it is smooth and re-tin it. A30. It will overheat and could burn the insulation of the wire being soldered. A31. The heating and cooling cycles. A32. Electronic components, such as resistors, capacitors, and transistors. A33. The soldering tips are hot only during the brief period of soldering the connection, thus minimizing the chance of burning the wire insulation or connector inserts. A34. The strands can fall into electrical equipment being worked on and cause short circuits. A35. It enables the tip to be removed easily when another is to be inserted. A36. Wrap a length of copper wire around one of the regular tips and bend to the proper shape for the purpose. A37. Tin and lead. A38. The solder dissolves a small amount of the copper, which combines with the solder forming a new alloy; therefore, the joint is one common metal. A39. 60-percent tin and 40-percent lead (60/40 solder). A40. It cleans the metal by removing the oxide layer and prevents further oxidation during the soldering. A41. Noncorrosive, nonconductive rosin fluxes. A42. To remove contaminants from soldered connections. A43. To prevent damage to heat-sensitive components. A44. To aid in tracing the conductors when alterations or repairs are required. A45. Round cord has a tendency to cut into the wire insulation. A46. Two and one-half times the length of the longest conductor in the group. A47. To keep the tape or cord from fouling during the lacing operation. A48. When required, such as for the filament leads in electron tube amplifiers. A49. Do not tie too tightly and use the proper type of tape. A50. With a square knot and at least two marling hitches drawn tightly. A51. Bundles that are 1 inch or larger in diameter A52. With a telephone hitch. A53. They are bound together at intervals with telephone hitches. A54. When wire bundles are supported by cable supports that are more than 12 inches apart. A55. Military Standard hand tool. A56. High-temperature, pressure-sensitive tape.
|
||||||||||||||||||||||||||||||||||||||||||||||||||